Report Shortcuts
Report shortcuts are the filtered views of master reports, and they represent the actual reports that can be run from Axosoft. You can create multiple report shortcuts for the same master report, thus having different filtered views of the same report.
While a report within Axosoft determines the layout and arrangement of the information in a report, the report shortcut lets you choose what information the report displays or what items the report includes, such as which defects you'd like to include in the report.
Report shortcuts can be set to always report on the same types of issues, for example, report on all defects where the status of the defect is open. This can be done using a filter or SQL expression. Alternatively, the report shortcuts can take the information from your Axosoft workspace grid and push the displayed items in your grid into the report. This lets you leverage all the power of your item grid against the report. For example, if you have a view within Axosoft that shows you items that you're interested in, you could select this view, then run a dynamic report shortcut to create a report that includes the items in your data grid.
You can create multiple report shortcuts for each report.
Report shortcuts can be public or private, similar to views and filters within Axosoft.
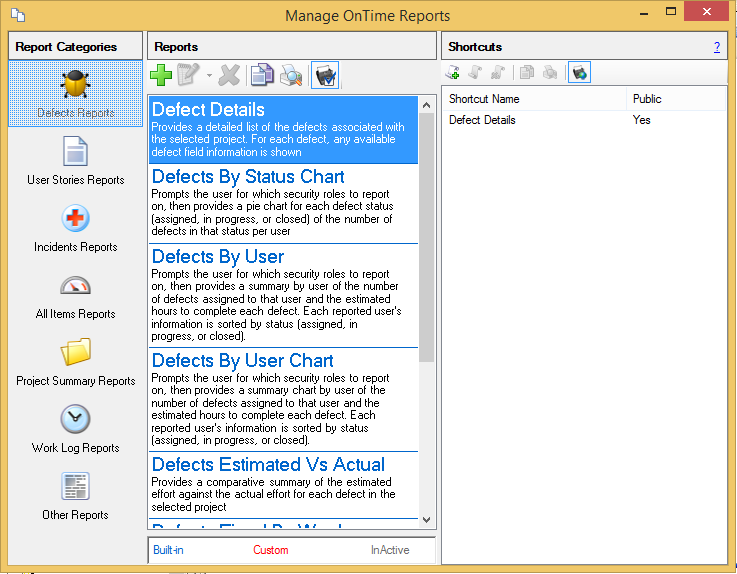
To manage report shortcuts, download the Report Manager and connect to your database. You will see the Report Categories column on the left, the Reports column in the middle and the Report Shortcuts column on the right.
Important: If you are an Axosoft hosted subscriber, you will need to enable Remote Server to utilize the Report Manager and Designer. Please email success@axosoft.com for more information.
Adding report shortcuts
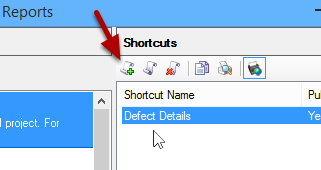
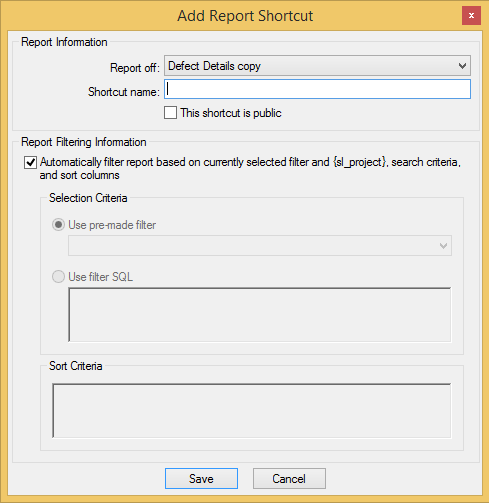
To add a new report shortcut, select the report for which you want to create a shortcut and then click the Add link on the Report Shortcuts toolbar. The Add Report Shortcut window will be displayed.
- Type in the name of the shortcut and select if you want the shortcut to be public. Public report shortcuts will be available for all users that have access to the report, while private report shortcuts will only be available to the user creating the shortcut.
- Check or uncheck the Automatic Filter check box depending on how you'd like to filter items for this shortcut
- Once you've entered all the filtering information click the Save button to save the report shortcut. Once you save it, the shortcut will appear as a report in the Print dropdown in Axosoft.
An explanation of what you see here:
- Automatic filtering — Automatic filtering will utilize your currently selected project, filter, search criteria and sort columns to determine which items to report on. Using automatic filtering for a shortcut will essentially take all the items from your main window list and place them into the report. This allows you to leverage views and filters dynamically to generate reports. For example, if you wanted to very quickly create a report on open defects that have the term “Product A” in the description, you could select the Open Defects filter, enter “Product A” in the search box, displaying the desired defects in your item grid. Running the Automatic Filtering shortcut will then create a report containing the defects listed in your item grid.
- Premade filtering — Premade filtering allows you to create a report shortcut that reports on the same type of information every time the shortcut is run.
- Use premade filter — Chose an Axosoft filter to run every time this shortcut is used.
- Use filter SQL — Instead of using a premade Axosoft filter, you can write your own SQL filtering criteria to be used every time the shortcut is used. This uses SQL syntax and essentially consists of the portion of a SQL statement after a
WHEREclause—for example,StatusTypeID =1. Note that theWHEREclause does not need to be entered. - Sort Criteria — Whether using a premade filter or a SQL filter, you can also type in your own sort criteria, which also uses SQL syntax. This will consist of the portion of a SQL statement after a
ORDER BYclause. For example:DefectID ASC. Note that theORDER BYclause does not need to be entered.
Editing report shortcuts
To edit an existing report shortcut, select the report shortcut from the Report Shortcuts column and click the Edit selected report shortcut button on the Report Shortcuts toolbar. The Edit Report Shortcut window will be displayed.
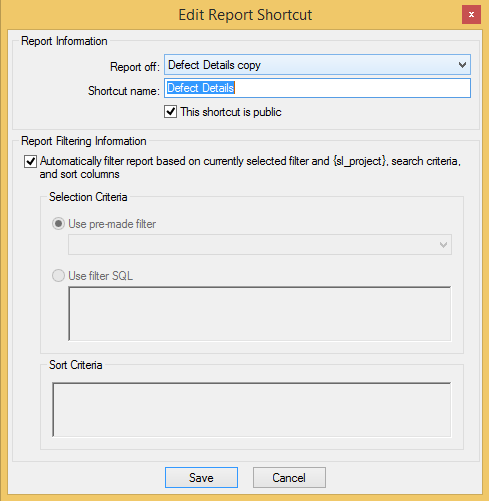
You may change any of the report shortcut information as well as the filtering and sort criteria. Once you've updated the information, click the Save button to save the changes.
Deleting report shortcuts
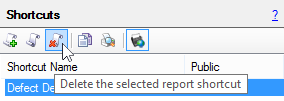
To delete a report shortcut, select the report shortcut and click the Delete button on the Report Shortcuts toolbar. A window will pop up asking you to confirm the deletion of the report shortcut.
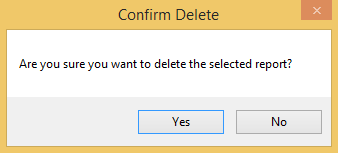
Once you click Yes, the report shortcut will be deleted and removed from the Print dropdown on the taskbar. Deleting a report shortcut does not delete the master report.