Configuring Email Accounts
This is where you convert emails from an inbox to Axosoft items.
SMTP settings
Your SMTP Server settings control outbound mail, including notifications.
For Axosoft hosted subscribers, we provide an SMTP server that is already configured, enabled, and ready for use.
This is the recommended setting for Axosoft hosted users. However, if you need to update this to a custom SMTP server, you can enter your connection information under Tools System Options SMTP Server.
Managing email accounts
Email accounts are used to collect inbound incidents, user stories, and defects. They can be configured at Tools Other Settings Email Accounts.
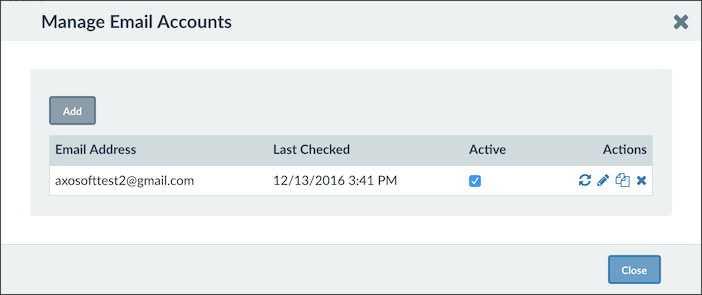
On the Manage Email Accounts screen, you can add a new email account using the button in the upper left. You can refresh, edit, copy, or delete existing accounts using the buttons on the right.
Note: Once the email account is configured, Axosoft will pull in all emails from the connected inbox.
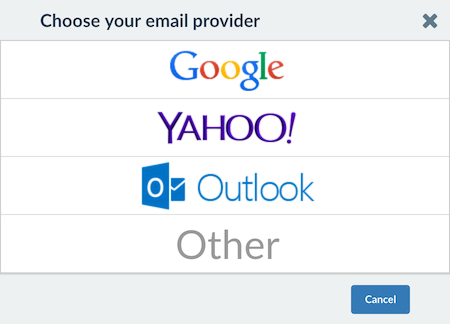
Adding a new email account
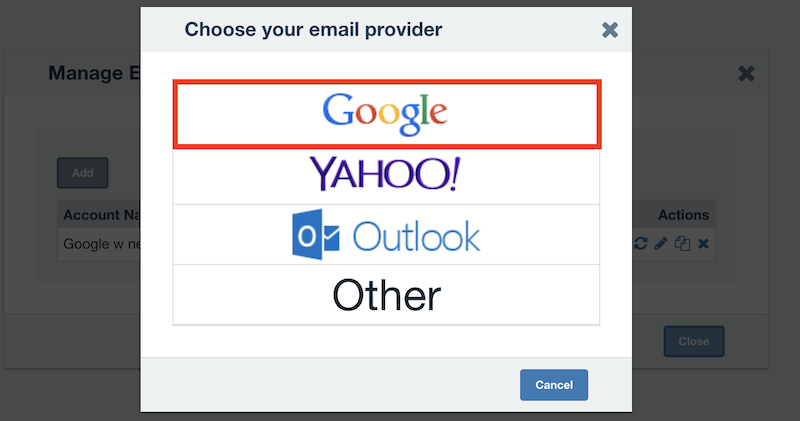
Select your email provider or select Other to connect using your POP/IMAP settings.
This screen presents the basic options for setting up your account. Be sure to set the Account Name towards the top to stay organized.
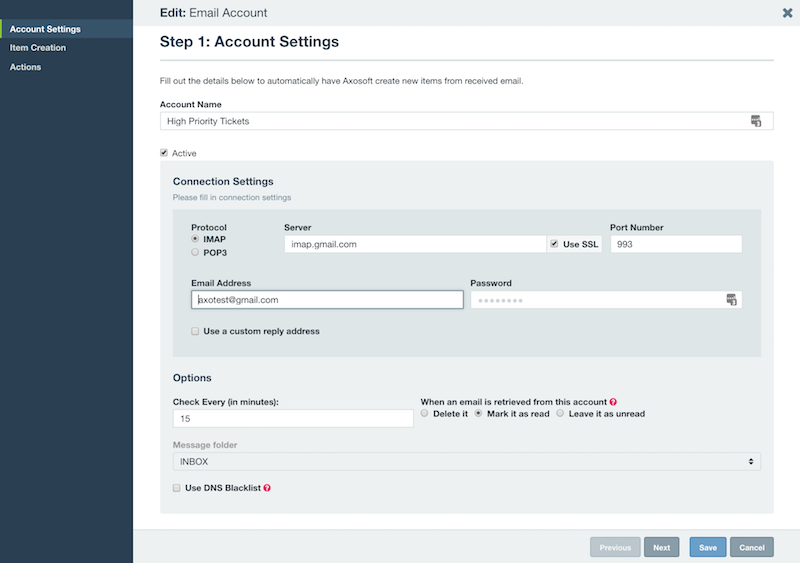
Tip: For best performance, we recommend checking the Delete it option to remove the emails from the inbox, after Axosoft has read them. This can also prevent a rare issue where emails aren't pulled into the system, because the header is modified and the email remains in the inbox.
You can of course devise a number of other backup or forwarding schemes on your server to have access to the original email files, but deleting them from the inbox as they are being read by Axosoft is recommended.
If using an IMAP account, the next screen will allow the selection of a folder to check for incoming emails from. It also offers the option to mark emails read or leave them unread. Click Refresh Folders to load a list of IMAP folders and then select from the dropdown menu.
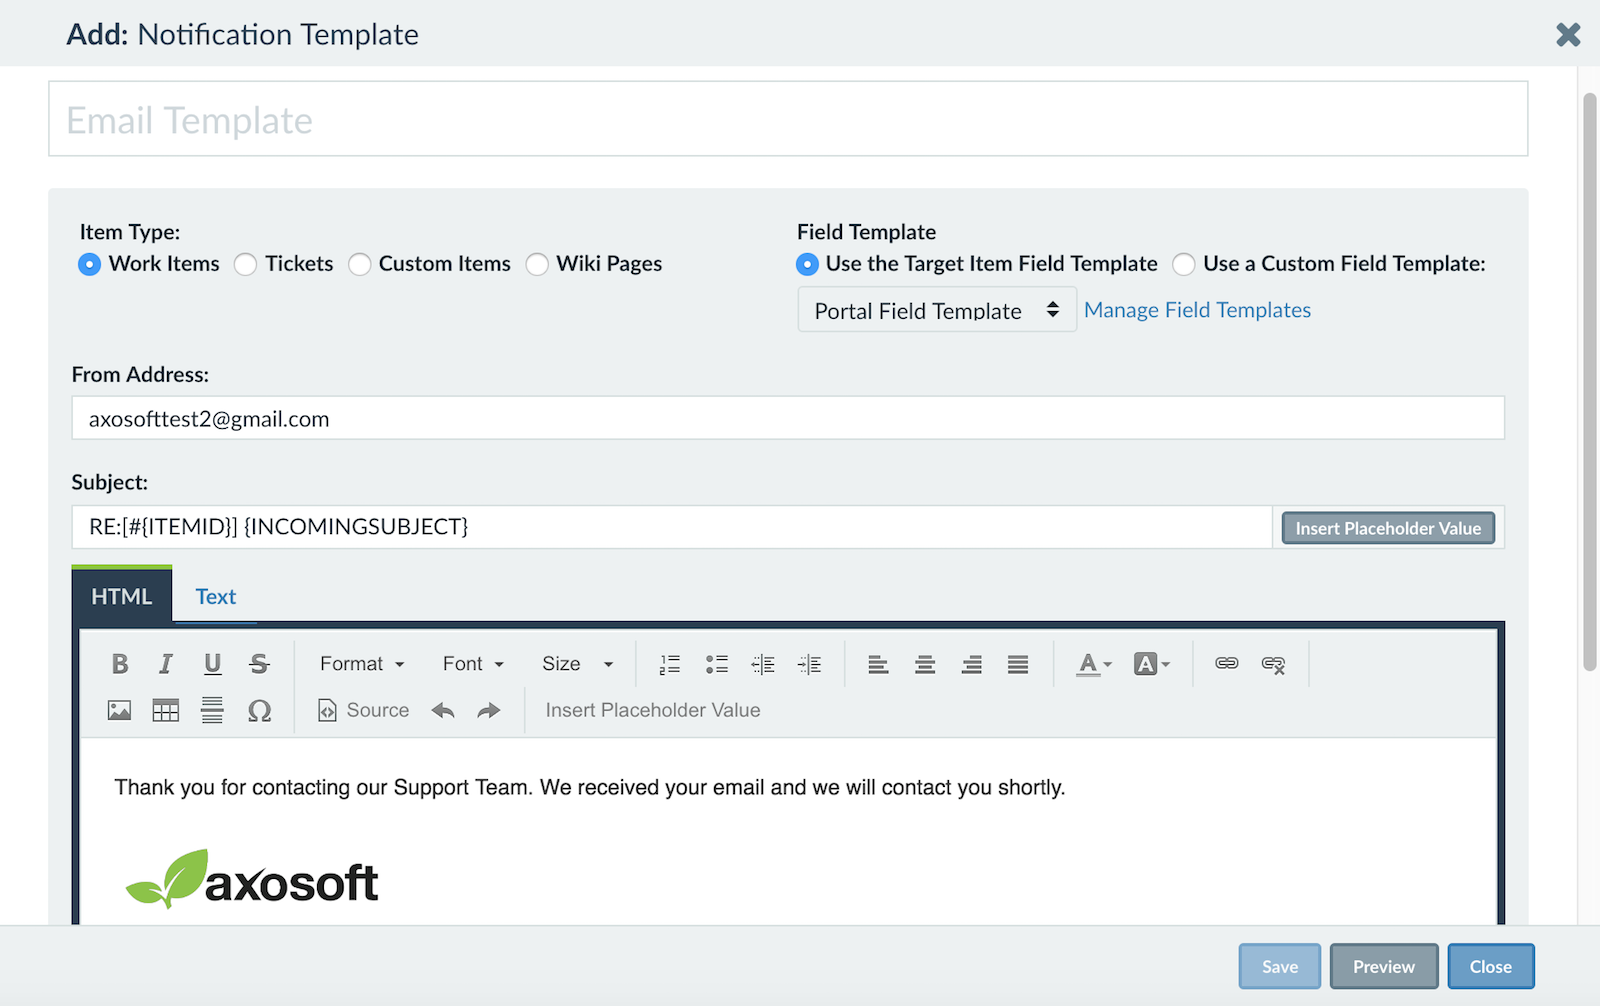
Important: We also recommend using the email address that you're using to import messages into Axosoft, as the From address in your notification templates, accessed via Tools > Notifications > Templates. This ensures that if a customer replies to a notification they receive, that it will be reimported and added to the item.
Read more about Notification Templates.
Two Factor Authentication (2FA)
If using 2 - Factor Authentication, you may see an error for invalid credentials. You would first need to add a new application, enter the security code sent to you, then use the application specific password when connecting to your account within Axosoft. For example, see Gmail's help page for more information.
In some cases when not using 2 - Step Authentication, you may need to allow "access from less secure apps" within your gmail settings and then connect. For access on gmail, follow less secure apps.
Connecting a Microsoft Email Account using OAuth 2.0
Installed customers will first need to perform these steps.
If you already had an email account connected using basic authentication, you will need to add a new email account connection as described below. We recommend making the existing email account inactive by unchecking the Active checkbox - this will allow you to reference the settings and revert to the previous connection if needed.
Microsoft email account connections use OAuth 2.0. To connect using OAuth 2.0, navigate to Tools > Other Settings > Email Accounts > Add and select Outlook as the provider when adding a new email account.
Select Microsoft Account Sign In and proceed with either selecting or signing into the desired account.

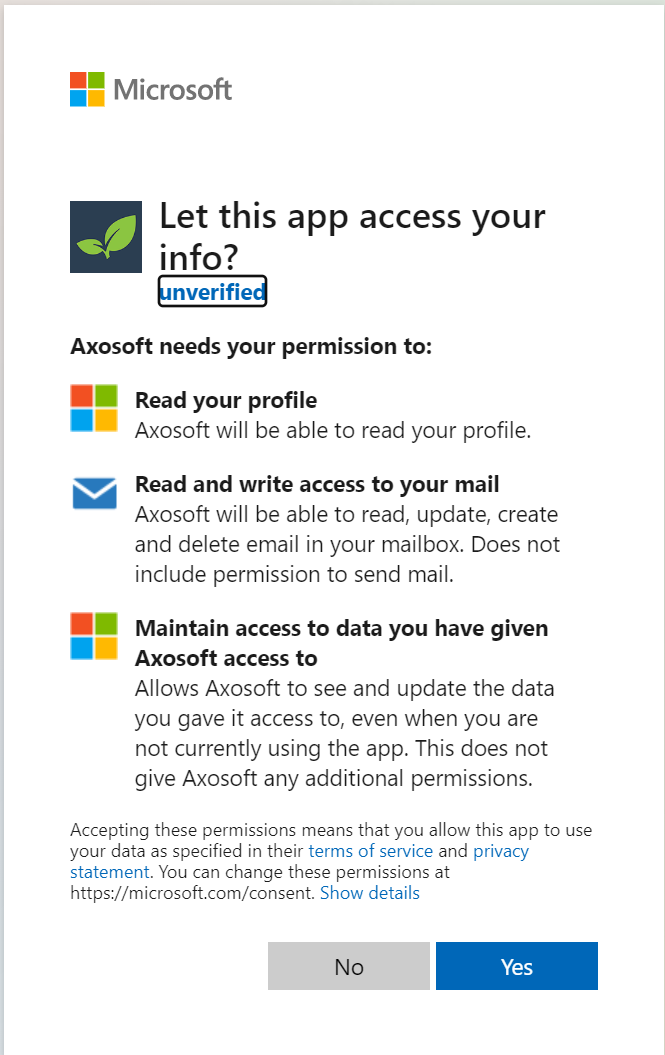
You will be prompted to grant Axosoft access to your Microsoft account. It is required to select "Yes" to give permission and proceed.
If you receive an invalid_request when trying to connect to a Microsoft account, you will need to contact support and provide your account URL so it can be added as an authorized account.

Connecting a Google Email Account using OAuth 2.0
Installed customers will first need to perform these steps.
If you already had an email account connected using basic authentication, you will need to add a new email account connection as described below. We recommend making the existing email account inactive by unchecking the Active checkbox - this will allow you to reference the settings and revert to the previous connection if needed.
Google email account connections use OAuth 2.0. To connect using OAuth 2.0, navigate to Tools > Other Settings > Email Accounts > Add and select Google as the provider when adding a new email account.
Select Google Account Sign In and proceed with either selecting or signing into the desired account.

You will be prompted to grant Axosoft access to your Google account. The option Read, compose, and send emails from your Gmail account must be checked. After selecting Continue, you will be connected and can proceed with setting up the rest of the email account settings.

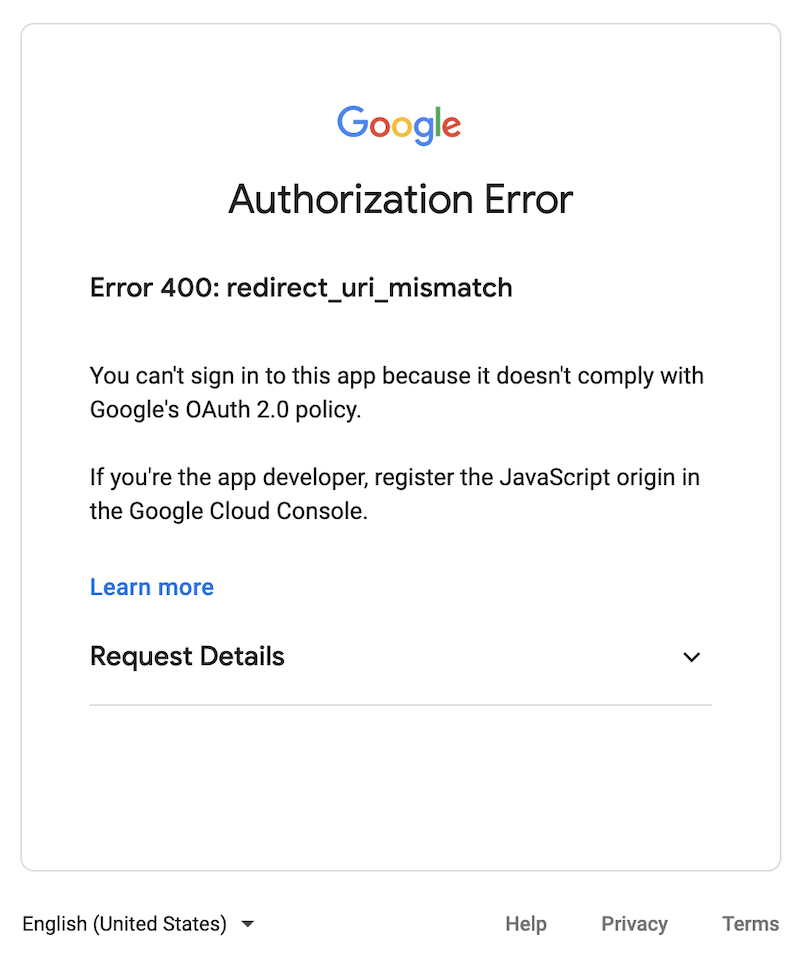
If you receive an Authorization Error when trying to connect to a Google account, you will need to contact support and provide your account URL so it can be added as an authorized account.
Creating items from emails
This is where emails get converted to Axosoft items.
First select the item type you wish to create (incidents are default), the project to add the new items, and which user would be listed as the creator of the new item. You also need to map the different fields from the email to the new item.
The defaults shown here are highly recommended.
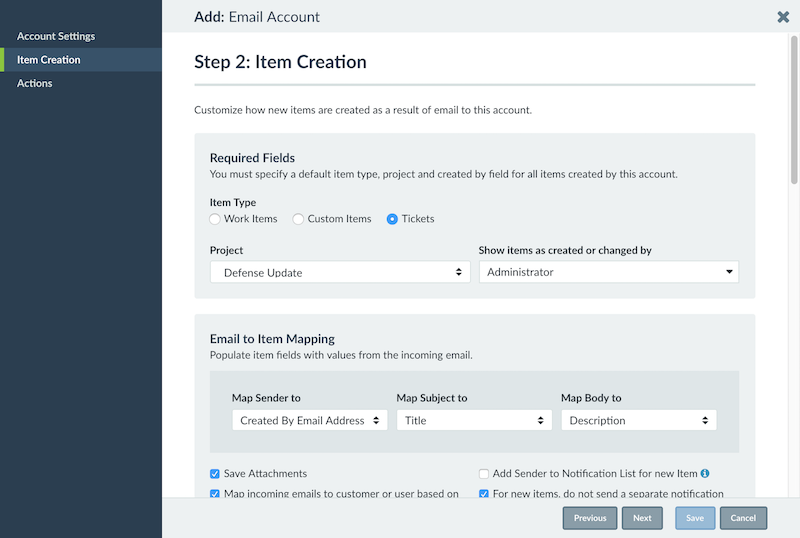
Note: The Project field is required.
The remaining fields have the following functions:
- Save Attachments: Allows attachments to be saved from the email, and attached to the item in Axosoft
- Add Sender to Notification List for new item: Sender will be notified of changes to the item (typically not recommended)
- Map incoming emails to customer or user based on email address: Attempt to relate incoming emails to appropriate customer
- For new items, do not send a separate notification for the email: This prevents 2 notifications from being sent out for the same new item
Set any default fields for new items at the bottom of the page. This screen will set default values for new items that arrive from this email account. To set the default value, check the box next to the field name and enter the desired value in the Change Value To column.
Note: Email accounts in Axosoft can be associated with a single item type. Any new emails received by Axosoft will create a new item (based on the item type selected here), or it will update any existing items using the item number in the subject line (for the item type selected here). If you want to utilize emails for other item types, just create an additional email account for each item type.
Email account actions
When a customer responds to a previously sent email, it will be automatically appended to the corresponding item. There is where you may configure whether status and workflow step update when new emails arrive.
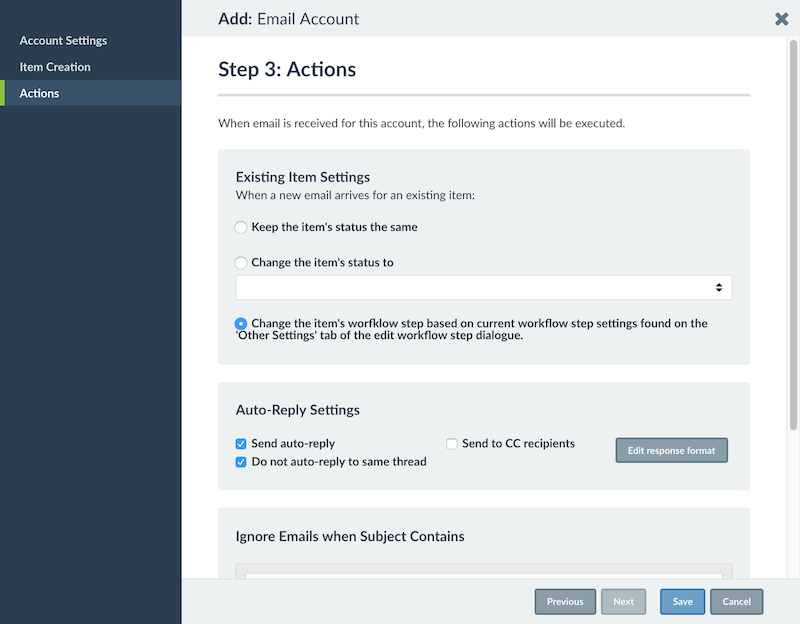
Note: If you select the option to change the workflow step, you also need to modify the item's current workflow step settings to select which workflow step to move it to, under Tools Other Settings Workflows. Edit the current workflow step, and under the Other Settings tab update the option for When a new email comes in for an existing item, place item in this workflow step.
Tip: It is highly recommended to use this option for Help Desk users when new emails come to update an item, as it can change the workflow step to reopen the item so it can be easily identified and responded to by your team members.
Auto-reply settings
Auto-replies are emails purposely sent back to the sender the moment Axosoft pulls in the email as an item. Use this to inform the sender you have their ticket, provide general resources, etc.

The settings have the following functions:
- Send auto-reply: Enables the auto-reply to fire for emails pulled in by this email account connection
- Send to CC recipients: If enabled, this will also send the auto-reply to any recipients copied in the initial email
Do not auto-reply to same thread: If enabled, auto-reply will only fire for the first email in thread
Edit response format: Set the format of the Auto-Reply that your customers will receive. For more information on working with notification templates, click here.
Warning: Axosoft auto-replies could trigger auto-replies from the sender if the sender also has auto-replies enabled. This will create an email loop that can be fixed by disabling the Axosoft auto-reply, deleting the duplicate emails directly from the inbox, and then re-enabling the Axosoft auto-reply. Consider filtering these auto-replies from your inbox to prevent the loop.