Microsoft and Google Email Configuration
This guide covers the setup required to connect a Microsoft or Google email account over OAuth 2.0 for Axosoft Installed.
Configuring Microsoft and your Axosoft Installed Instance
Requirement: You must be on Axosoft Installed version 22.1.1+ in order to use this feature.
Please Note: We provide the following settings as a courtesy. Axosoft does not provide support for Microsoft O365 email or any Microsoft Services.
To configure a Microsoft Email account connection with OAuth 2.0, start by going to the following link to open your Azure portal registered applications and select New registration:
https://portal.azure.com/#view/Microsoft_AAD_RegisteredApps/ApplicationsListBlade
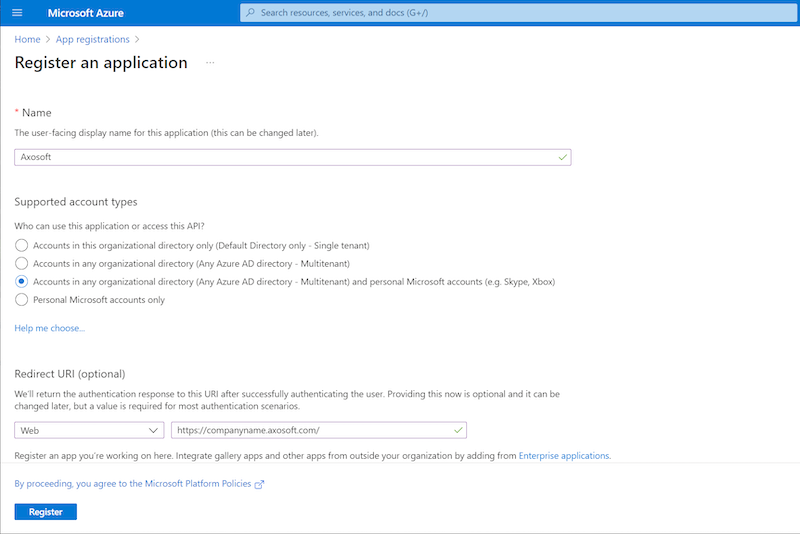
Enter a name for the application. For Supported account types:
If you have your own tenant and will only connect with accounts in that tenant, select Accounts in this organizational directory only.
Otherwise, select Accounts in any organizational directory and personal Microsoft accounts to allow the use of any account.
For Redirect URI:
Select Web and enter your axosoft account url. An example would be https://localhost/axosoft/.
If you are having issues please see this Microsoft documentation for how to format your redirect URI.
Click Register to save.
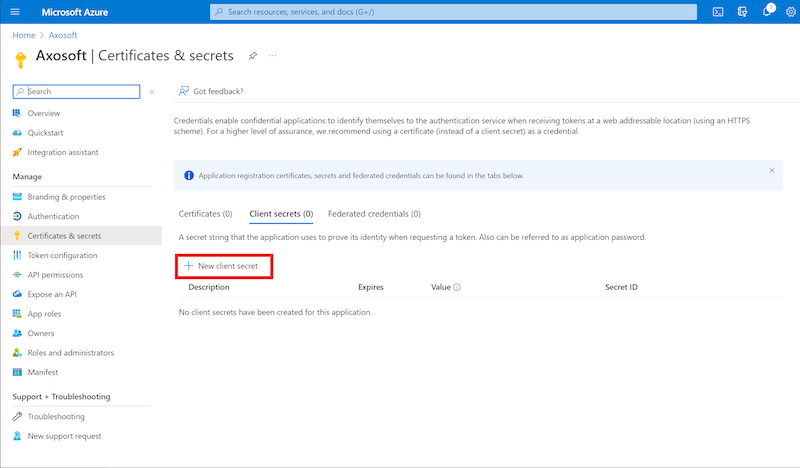
Next, navigate to Certificates & secrets and then New client secret to add a secret.
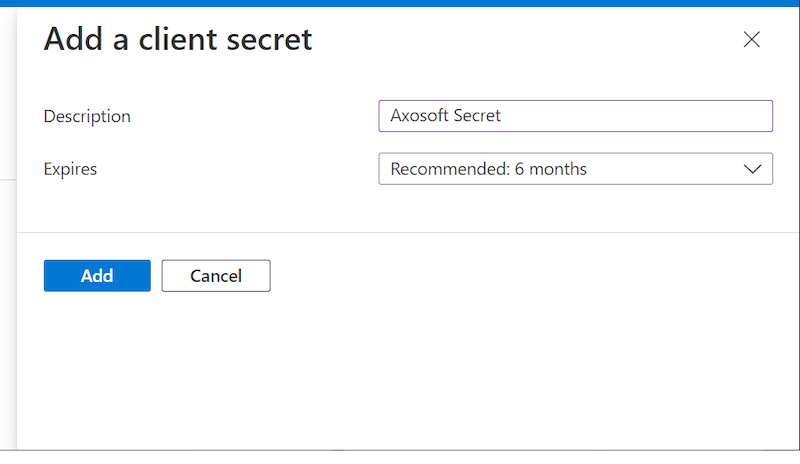
Enter a name and choose an expiration time. Then, click Add.
Copy the secret Value. Note that on this page the number shown under secret id is only the identifier of the secret and not the secret itself. You must use the Value of the secret and it will only be accessible for a short time after it has been created.
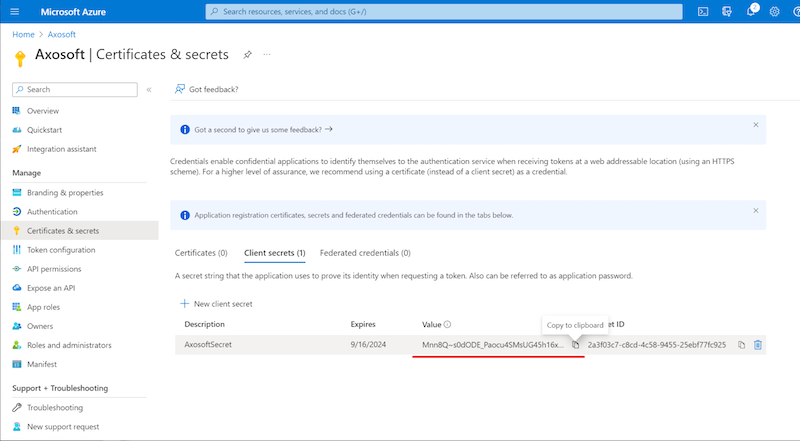
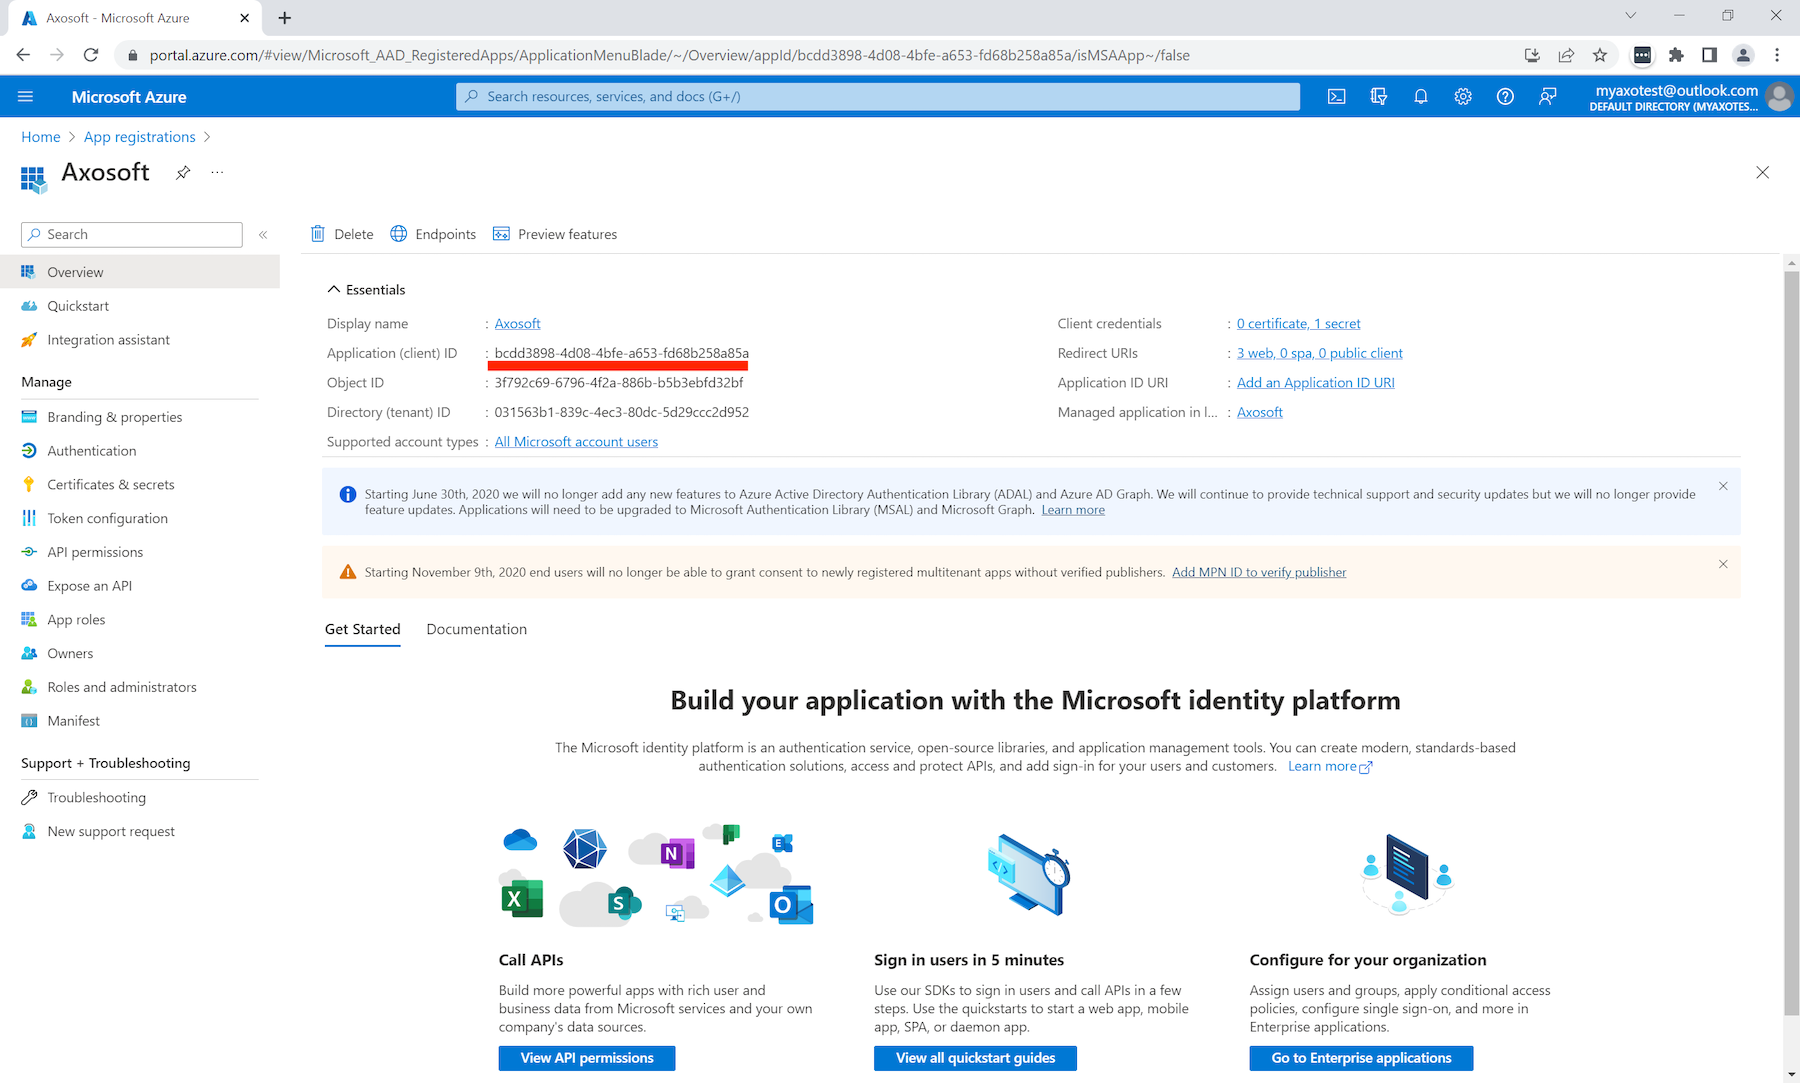
Select Overview and copy the Application (client) ID.
Navigate to where your Axosoft website files are located (C:\inetpub\wwwroot\Axosoft by default) and add a text file named user.config with the following contents. Replace the values with your client ID and secret.
<?xml version="1.0" encoding="utf-8" ?>
<appSettings>
    <add key="MicrosoftClientId" value="your client id" />
    <add key="MicrosoftClientSecret" value="your secret value" />
    <add key="MicrosoftTenant" value="your tenant id or no value if you don’t have one" />
</appSettings>
Navigate to where your Axosoft Email Service files are located (C:\Program Files (x86)\Axosoft\[YEAR]\Email Service by default) and insert the following into the AxosoftService.exe.config config file. Replace the values with your client ID and secret. This needs to be included within the existing
<appSettings>
    <add key="MicrosoftClientId" value="your client id" />
    <add key="MicrosoftClientSecret" value="your secret value" />
    <add key="MicrosoftTenant" value="your tenant id or no value if you don’t have one" />
</appSettings>
NOTE: This section must be in "appSettings" inside "configuration". If the "appSettings" section does not exisit, it must be created. If it already exisits, these lines can be added into the exsiting section. Placing this in the wrong location can cause errors.
After updating your configuration files, you will need to:
- Restart your site from IIS.
- Recycle the application pool from IIS.
- Restart your email service.
Once this is complete, proceed with connecting your Microsoft Email Account.
Configuring Google and your Axosoft Installed Instance
Requirement: You must be on Axosoft Installed version 22.1.0+ in order to use this feature.
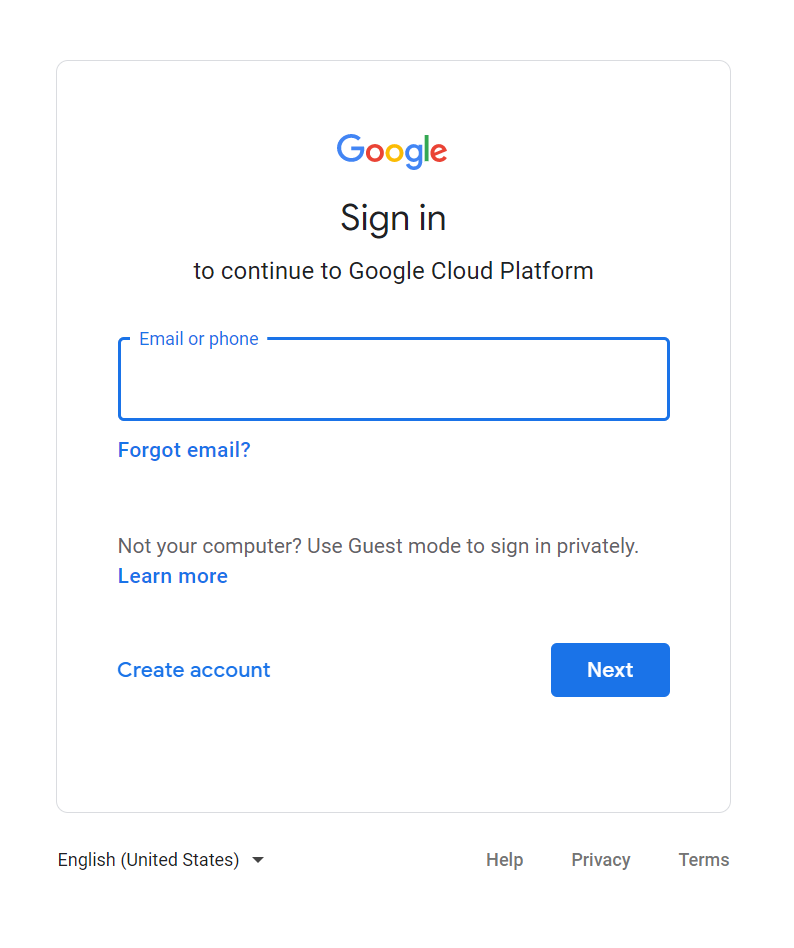
To configure a Google Email account connection with OAuth 2.0, start by going to https://console.cloud.google.com/projectcreate. Log in with an account that is associated with your organization. Note that @gmail.com addresses will not work for this.
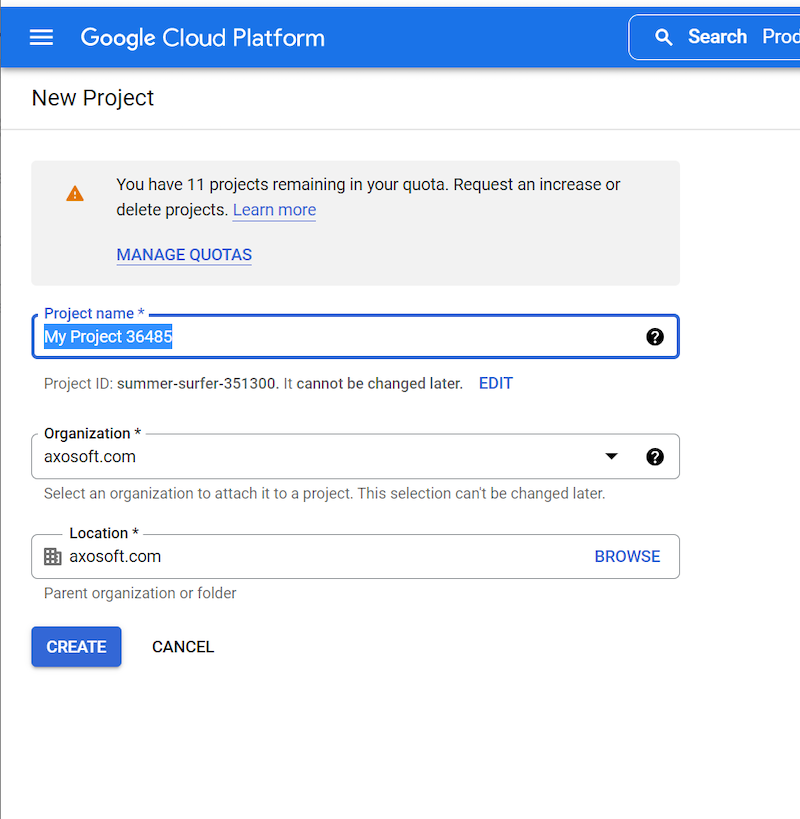
Name and create your new project. You must use the organization which contains the email account you will be logging into for use with the Axosoft Email Account Management.
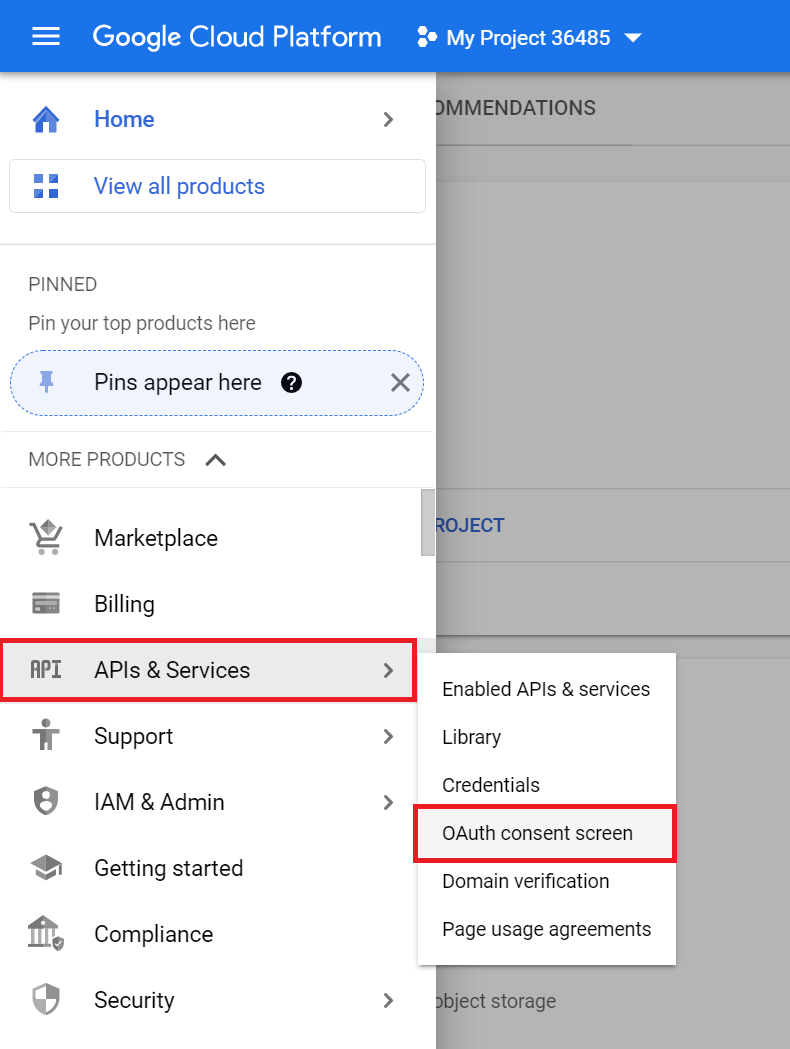
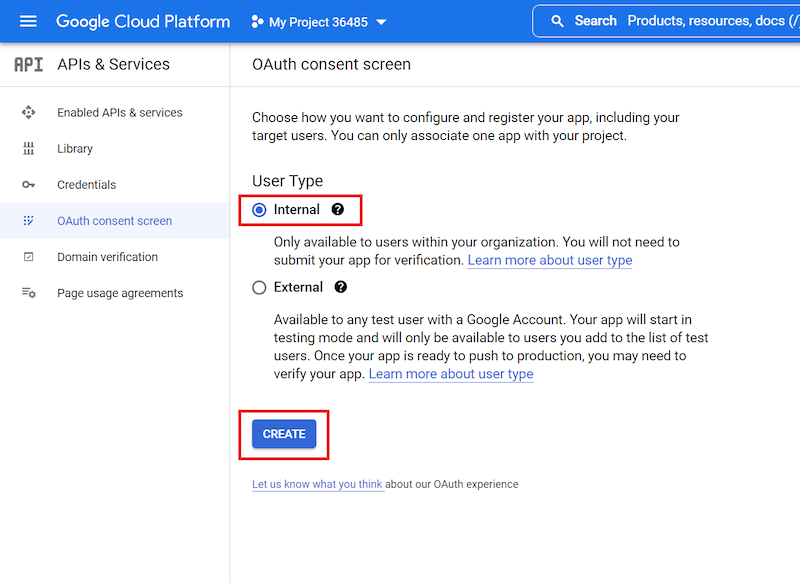
Go to the APIs & Services > OAuth consent screen menu option.
Select Internal User Type and then click Create.
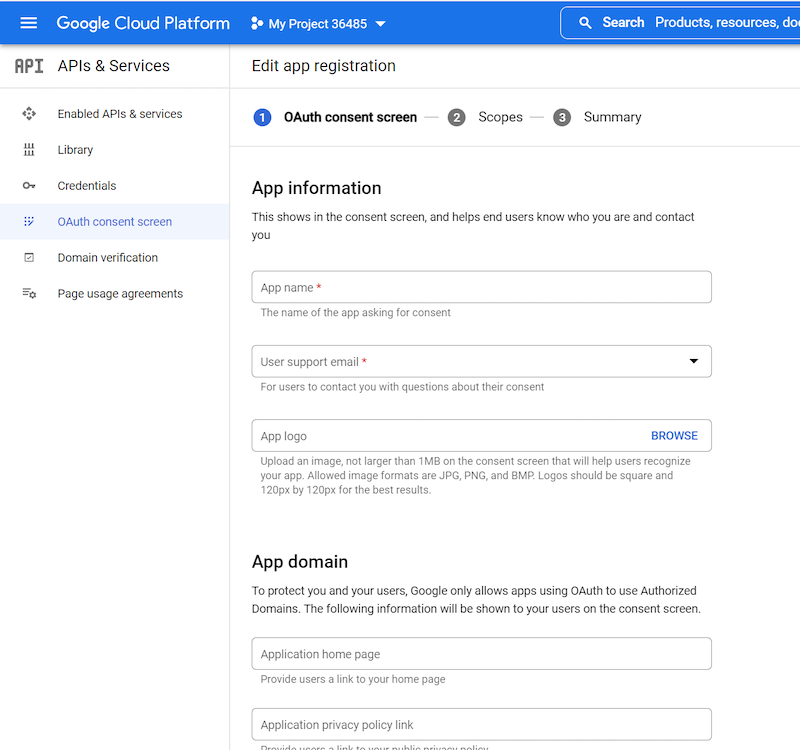
Fill in the three required fields of the app information. These are “App name”, “User support email”, and “developer contact information”. Use your own email addresses for the user support email and the developer contact information and use an app name of your choice. Click Save and Continue.
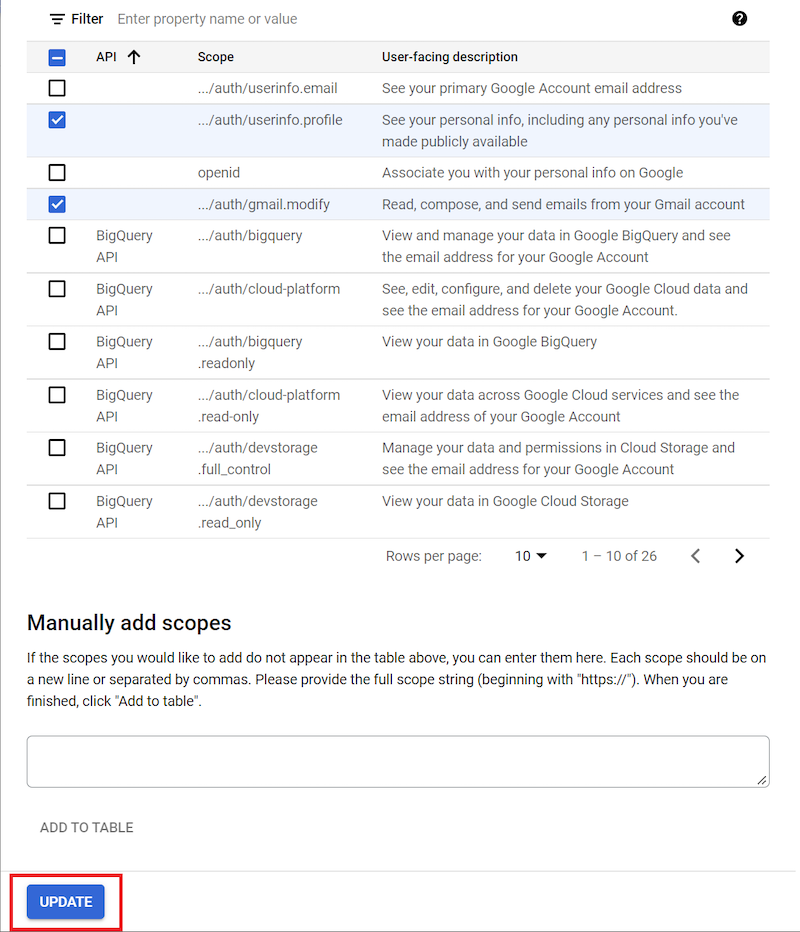
Click the ADD OR REMOVE SCOPES button.
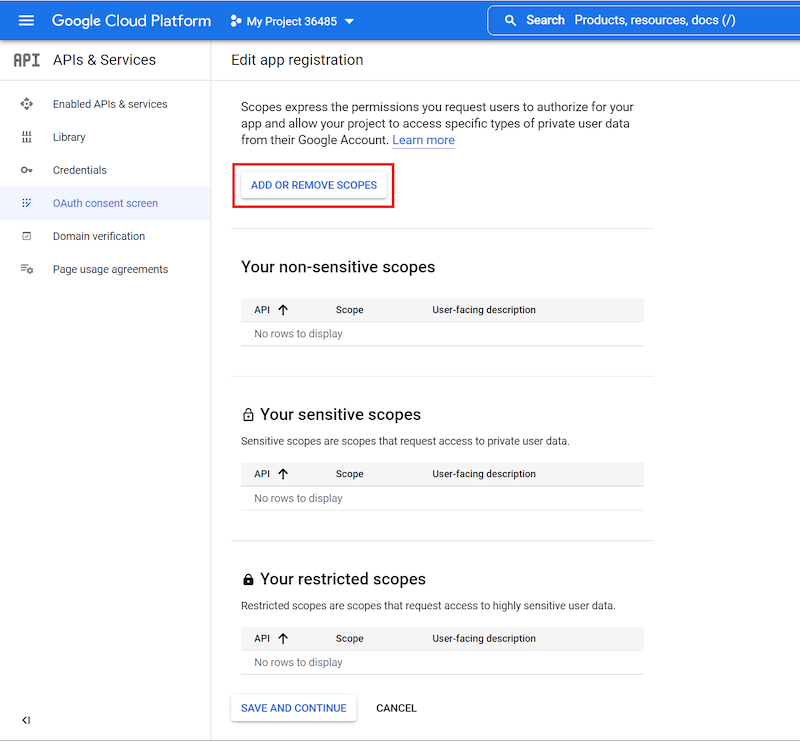
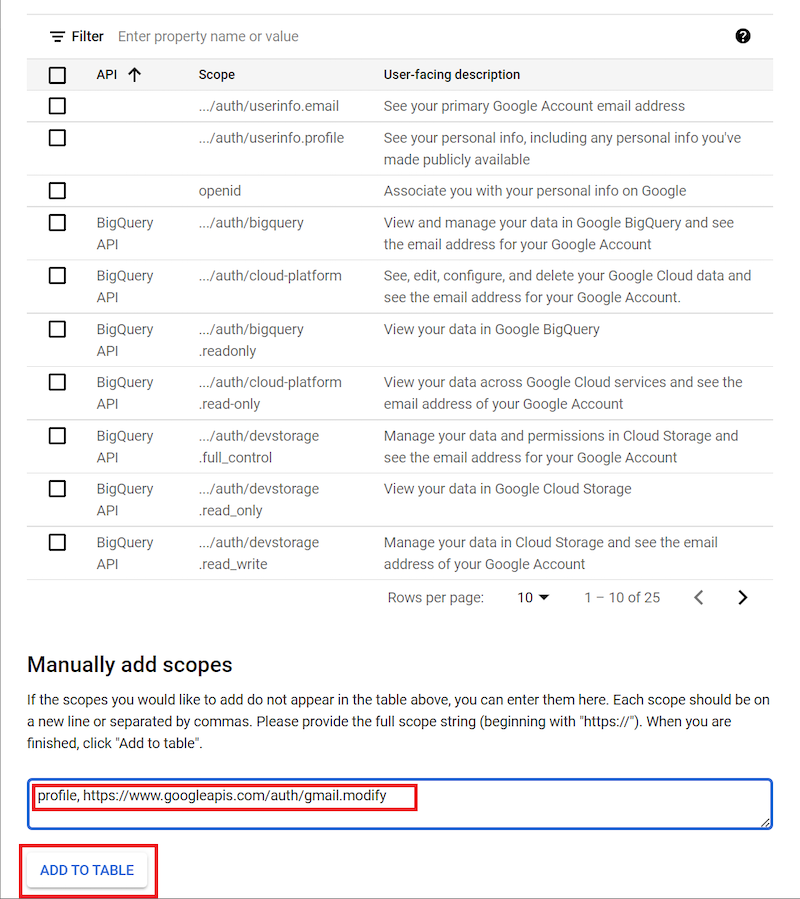
In the Manually add scopes box enter:
profile, https://www.googleapis.com/auth/gmail.modify
Then click the ADD TO TABLE button.
The correct APIs will be automatically selected after the manual add and now just click the UPDATE button to save.
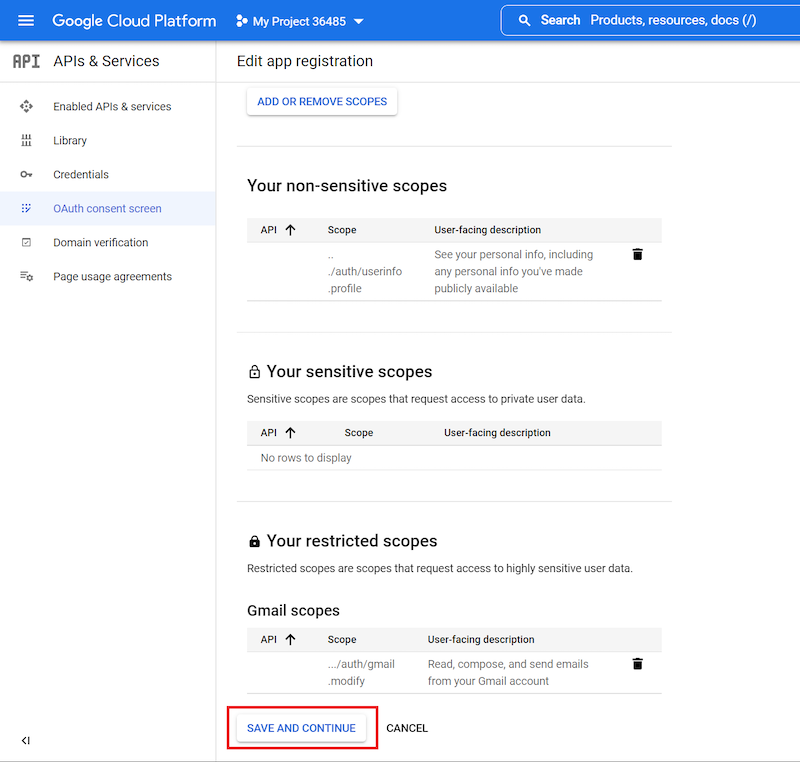
The APIs will now be shown in the app registration screen. Click SAVE AND CONTINUE.
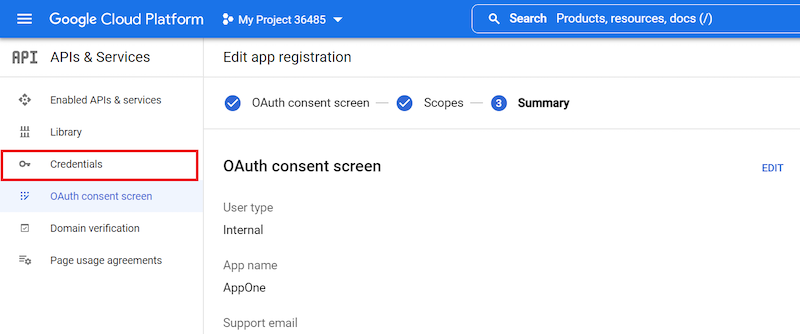
Review the summary page and then click on the Credentials menu item.
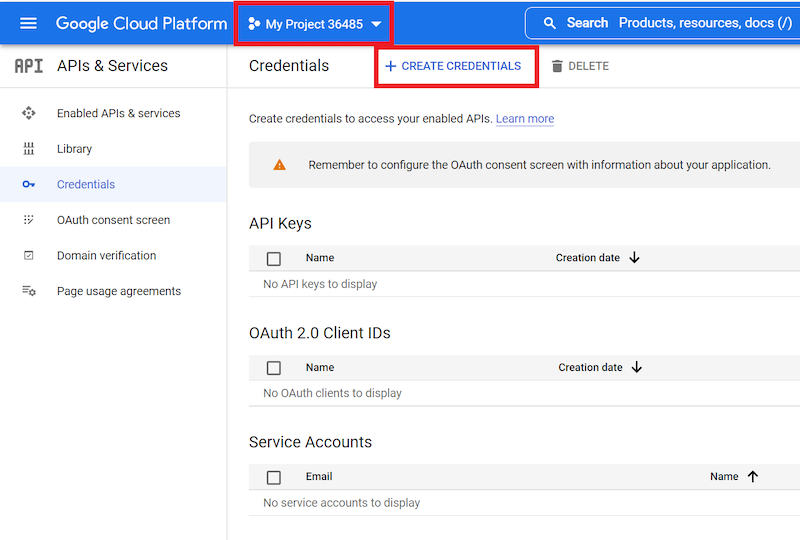
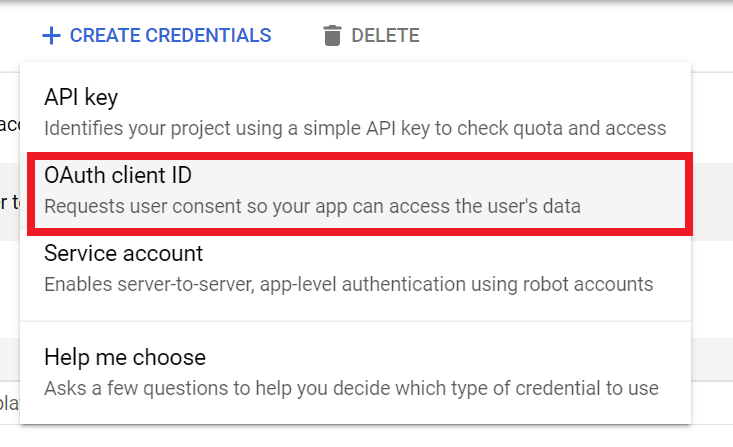
Make sure that your new project is selected and click the + CREATE CREDENTIALS button.
Choose the credential type of OAuth client ID to create.
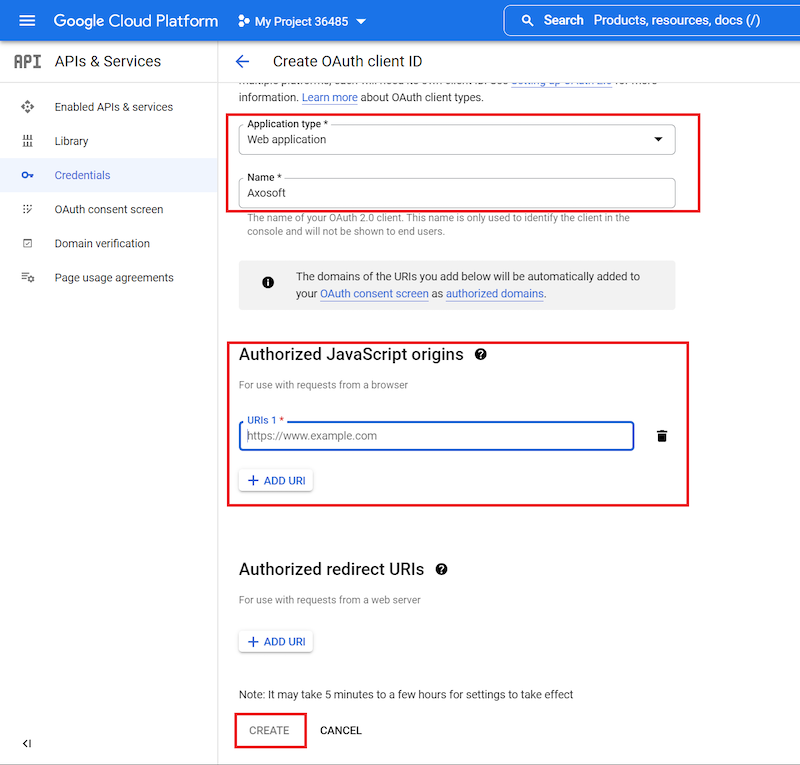
Choose an application type of Web application which will bring up the rest of the fields on this form. Enter a name for the client. Then under the Authorized JavaScript origins section click the + Add URI button and enter the URI that is being used for your instance of Axosoft. This is the URI that you would go to when you use the Axosoft application. Click CREATE and the OAuth client will be created.
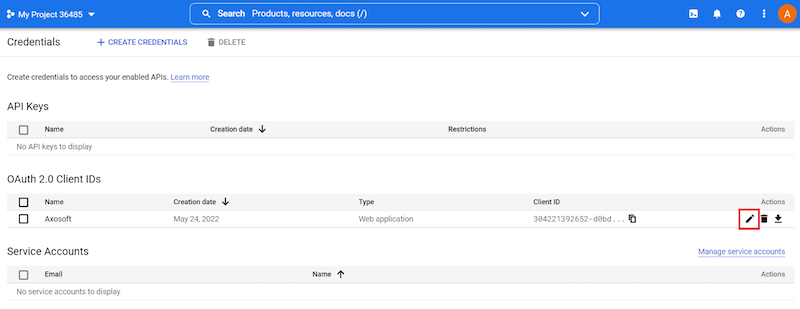
The Client ID and the Client Secret for the OAuth client will be needed to create settings for Axosoft. These values can be viewed later at any time from the OAuth client edit screen. Click OK to close this form.

Click the pencil icon for the edit screen to retrieve the Client ID and Client Secret if you did not get them after creating the client.
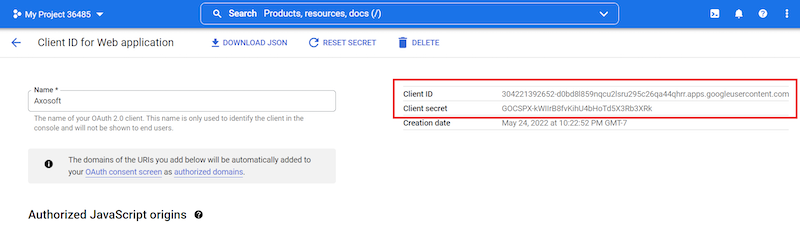
Navigate to where your Axosoft website files are located (C:\inetpub\wwwroot\Axosoft by default) and add a text file named user.config with the following contents. Replace the values with your client ID and secret.
<?xml version="1.0" encoding="utf-8" ?>
<appSettings>
    <add key="GoogleClientId" value="304221392652-d0bd8l859nqcu2lsru295c26qa44qhrr.apps.googleusercontent.com" />
    <add key="GoogleClientSecret" value="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" />
</appSettings>
Navigate to where your Axosoft Email Service files are located (C:\Program Files (x86)\Axosoft\[YEAR]\Email Service by default) and insert the following into the AxosoftService.exe.config config file. Replace the values with your client ID and secret. This needs to be included within the existing
<appSettings>
    <add key="GoogleClientId" value="304221392652-d0bd8l859nqcu2lsru295c26qa44qhrr.apps.googleusercontent.com" />
    <add key="GoogleClientSecret" value="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" />
</appSettings>
After updating your configuration files, you will need to:
- Restart your site from IIS.
- Recycle the application pool from IIS.
- Restart your email service.
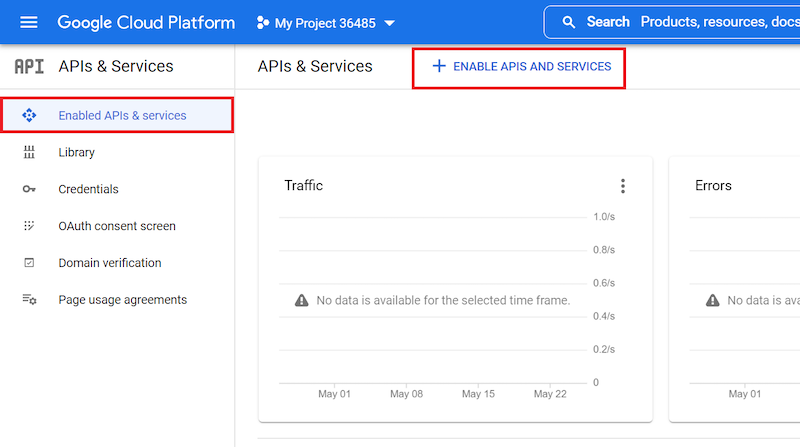
Select the Enabled APIs & services menu option and then click the + ENABLE APIS AND SERVICES button.
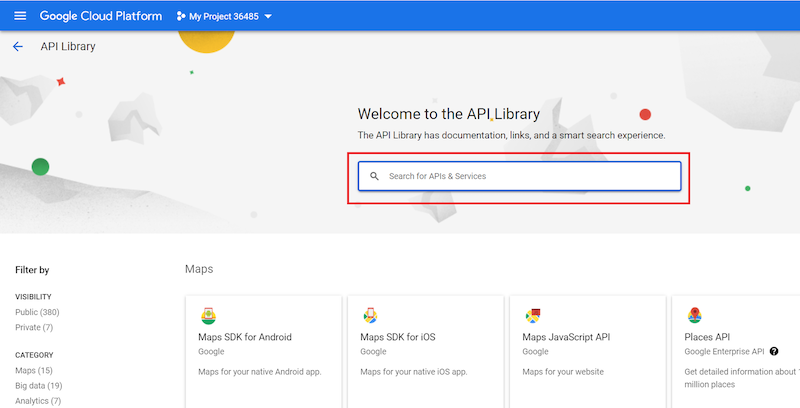
Enter “Gmail API” in the search box and select the "Gmail API" search result.

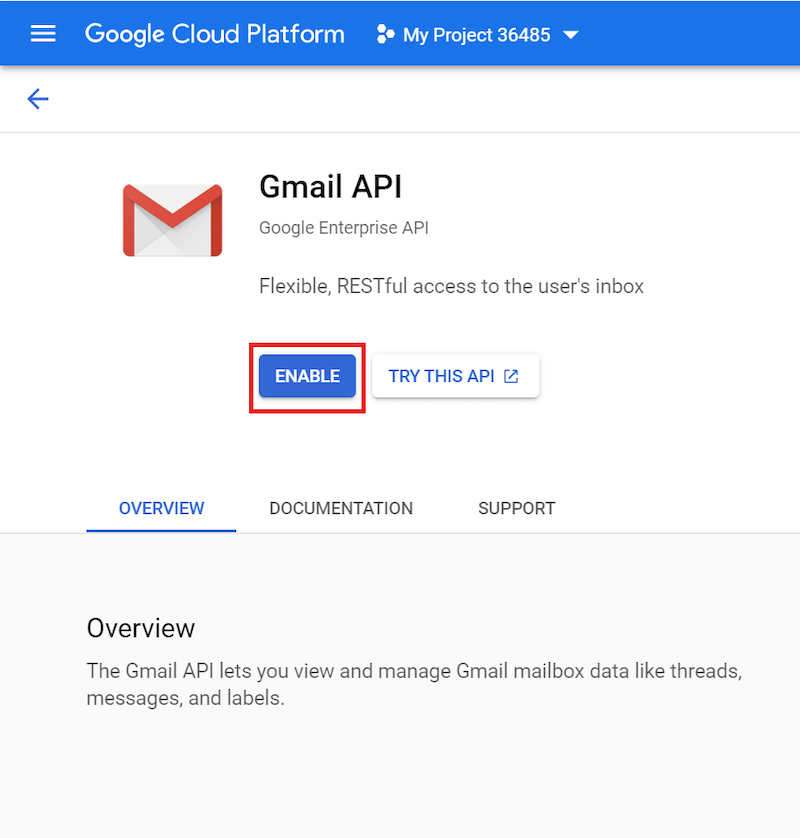
Click ENABLE to add this API to the project.
Once this is complete, proceed with connecting your Google Email Account.