Importing Data
Axosoft allows you to import defects, user stories, incidents, and customers from a CSV file. First, select the appropriate workspace item tab at the top of the page and go to Tools Utilities Import. Items to be imported should be in separate files: one for defects, one for user stories, etc.
Preparing for import
When importing items into Axosoft, some consideration needs to be made to the incoming data regarding associations that will be made within Axosoft. If there is no existing content in the Axosoft database to associate certain imported fields to, then the data will not be imported. It is recommended that the following steps be taken before the import:
Create any projects that will have items tracked against them. If projects do not exist when items are imported, the items will not be assigned to a project and will only show when items for All Projects are listed.
Create the users referenced by the items to be imported. Again, if the users do not exist when items are imported, the Assigned To and Reported By field data will not be imported.
Create any custom fields that will be needed. If the fields are not there, data will either need to be mapped to one of the default Axosoft fields or be lost.
Remove any special characters from the CSV file to be imported. For example, ensure that percentages are shown as just numbers and that they are each between zero and one hundred. Any duration fields like Original and Remaining Estimate or Actual Duration would need to use the value and then a space, then the abbreviation for the time unit listed under Tools Fields List Types in Time Unit Types (Example:
4 hrs,120 min,4 sp).For any fields whose values in Axosoft will be pick list types, ensure that the available pick list values match the values in the data. If a value is in the data to be imported, but not currently defined in the pick list, it will be discarded.
Note: Axosoft will place all items in the first workflow step defined by your project. If you are importing items which would need to be placed in different workflow steps, you can first import the items, and then use the Multi-Edit function to move to the desired step.
Importing items
Once the file has been set up for the import of data, defects, features, tasks, incidents or customer information may be imported from an existing CSV file. The process for importing items is the same regardless of item type.
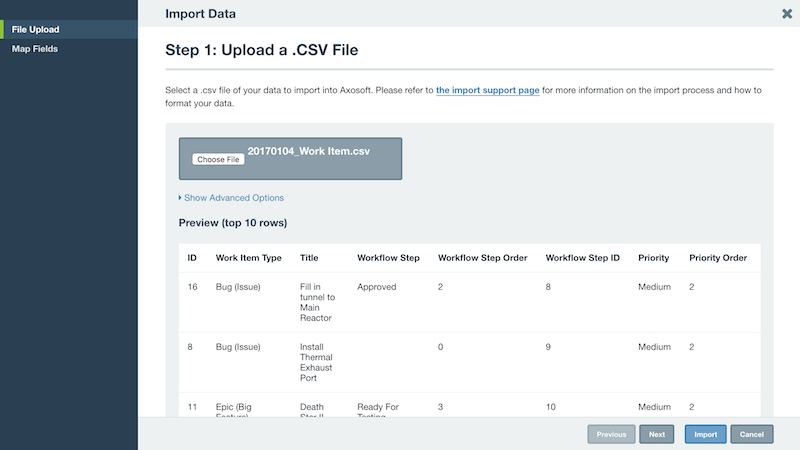
The first piece of information to be completed is the name of the file to be imported. Use the Choose File button to navigate to and select the file to be imported.

Ensure that the delimiting character and text surrounding character have been defined as they are in the file. This can be selected under the Show Advanced Options link. If the first row of the file contains the column names, ensure that the First row contains column names box is checked.
Once the preview looks acceptable, select Next to begin the field mapping.

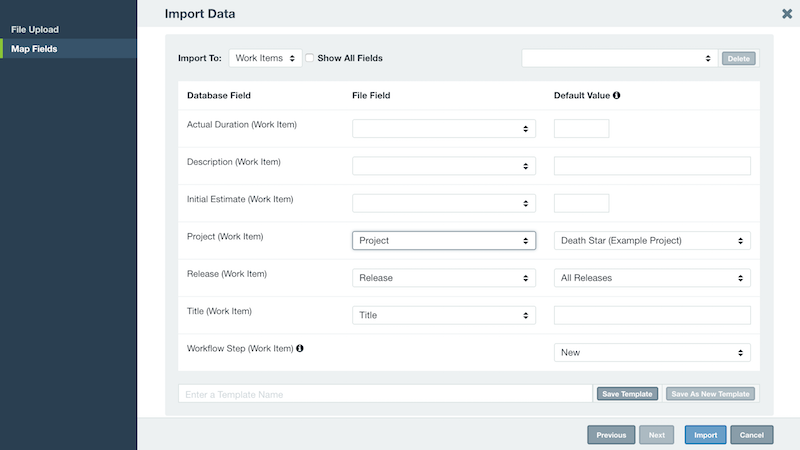
As can be seen from the screen shots, the field mapping is not pre-defined in any way. When importing data, the field map must be created from scratch or from an existing Field Mapping Template.
To create the field map, select a field from the file being imported from the dropdown list in the right column for each appropriate Axosoft database field in the left column. In addition, for each field, a default value can be established. This value will be used when the file field is blank or if there is no file field mapped to the existing database field.
Important: The right column allows for default values to be entered for the items if nothing is imported. While most of these can be left blank, the Project field is required.
Importing customers
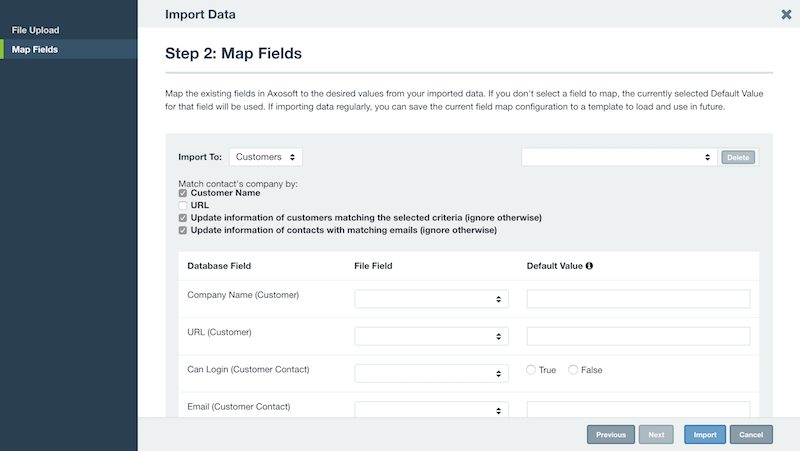
Customers can be imported from the More menu from Tools People Customers and Contacts. If you are importing customers, first select the .CSV file contacting customer data then select the Next button.
On the Map Fields tab, from Import To dropdown, select Customers. You can then do the appropriate field mapping from the file to fields for customer contacts.

Finishing the import
When field mapping is complete, proceed by selecting the blue button which will prompt for confirmation on the import.

When the button is clicked for import, Axosoft will automatically add all imported items into the database, and they will be searchable and filterable. When the backlog is loaded the items will then be available and seen to the specifications of the import mapping.
One thing to note is that five fields are never able to be imported: History, Workflow Step, Emails, Attachments and Comments. If these fields exist in the .CSV file to be imported, they will not be able to be mapped to the correct Axosoft fields. Audit trail information cannot be added to the database, as it is internally created and generated.
Attachments will need to be re-attached to items using the Axosoft interface one item at a time, or imported using Axosoft RESTful APIs. For more information on the methods available in the API, you can view our API documentation.